How Zone System Works: Zone System Calibration
(N.B. - I wrote these instructions for Zone System Calibration intending them as a sequel to the previous two articles about the conceptual and technical underpinnings of ZS. However, anyone is welcome to read this unto itself. However, this is a key piece setting up the last article in my series which will directly address the mistakes and misinformation in Johnny Patience’s Zone System is Dead blog.)
(N.B.B. - The calibration example in this article is from well over 15 years ago. I saved many of the materials, but some of my notes are lost. The prints are in good condition if one considers tonality only, but they are very scratched and dusty. I did my best to clean them up minimally in Photoshop.)
1.0 First Steps
1.1 Give Yourself Time
This calibration procedure cannot be rushed. Best to perform this over a weekend with comfortable time limits. Try to limit any extraneous distractions so you can give each step your undivided attention. Don’t rush!
1.2 Select One Set of Photographic Materials to Test
I am writing this under the assumption that you have access to a film camera, a graycard, and a darkroom. (I am also assuming that you understand how to develop film and print in a darkroom.) I should also admonish you that you need to perform these steps only using one fixed process. By that I mean you need to pick one film, one developer, one paper, one paper developer. etc. If you change anything in this system you will need to perform this series of steps all over again to recalibrate the system.
If you are just starting down the road of calibrating your materials for Zone System I would avoid testing multiple films. I recommend just focusing on one set of materials to begin with in order to become comfortable with the methodology. As you become comfortable with the procedure I would expect someone to juggle multiple variables during a period of testing.
1.3 Set Up a ‘Scene’
You will also need to set-up a scene so that you have a standard visual reference to observe an photograph. The first scene I used to calibrate materials can be seen in the prints starting with Image 5.2. (I have different opinions now as can be seen in Image 1.0.)
Light your scene with artificial light in order to avoid changes in intensity or quality in daylight conditions. Also, since you should expect to recreate this scene (except with a few changes) for future calibration tests lighting with artificial lights provides greater control. I expect the scene to include at least an 18% graycard, an object that spot meters three stops over middle gray, and an object that spot meters three stops under middle gray. (These are Zone II and Zone VIII values and are extremely important to the calibration procedure.) Additionally, I highly recommend the following: an X-Rite Colorchecker, slightly crumpled aluminum foil, slightly crumpled black wrap, and objects that spot meter in whole stop increments above and below middle gray. I have a friend who keeps all the objects in a box so he can easily access them and set them up.

Image 1.0 - The scene above is composed of teaware that contain areas that spotmeter as whole stop differences. It also includes some standard charts; a graycard, the Kodak Q-14, and the X-Rite Colorchecker. Below is the key indicating which areas of the teaware are in each Zone. I particularly like the porcelain dish in Zone IX because it contains a relief that will not render correctly unless your system is optimized. I have only used this scene in current times testing digital cameras.
1.4 Set Up Your Darkroom
Make sure your darkroom is set up and your darkroom processes are standardized. This entails making you sure there is no variation in the control of your tools. There should be no fluctuation of the intensity of your enlarger bulb when the refrigerator turns on. The faucet should be able to supply water at a consistent temperature. The thermometer you own has been checked and calibrated. Your safelight does not fog your paper. Your agitation technique is consistent, etc.
Remember that you are approaching these tests as a scientist would approach an experiment. Ruthless consistency is the method of operation and I’ve seen many a good darkroom printer produce prints in a ritualistic manner.
2.0 Effective Film Speed (EFS)
After selecting a single set of photographic materials and ensuring the darkroom is properly set-up we can begin the first test. However, I would be remiss in glossing over some important technical background.
2.1 Defining ISO, EI, and EFS
Film manufacturers provide an ISO or EI for the film. There is an important distinction between these two terms. An ISO rating is produced following the procedures outlined in document ISO 6:1993. (This document covers black and white negative film.) However, the manufacturer can also decide to publish a “best practices” recommendation so long as it is labeled EI, or Exposure Index. As an example, Fuji F series motion picture films (now discontinued) displayed an EI rating. However, I discovered that by applying the ISO calculation procedures on the sensitometry charts the film was actually one stop slower than the published EI! You may be wondering why they would be allowed to do this? Well, it was up to you as an informed consumer to recognize the difference and perform your own exposure/development calibration tests.
Many amateurs entering the world of black and white photography discover their initial rolls of film underexposed. While this can be due to metering mistakes, I also find it common that their choice of film developer results in a loss of film speed. One should remember that when a film manufacturer publishes film speed and developing times it is for a specific film and developer combination and in ideal settings. The decision to use a different developer can radically change the EI of your film. This is why Zone System calibration is such an important first step.
When I first learned Zone System calibration methods I was taught to use the term EFS, or Effective Film Speed, for the speed rating established by my test. EFS is synonymous with EI and you are welcome to use either term interchangeably.
2.2 Shooting the EFS Test
Load one roll of film into your camera and frame the graycard in your scene so that it fills the entire frame. For this test each exposed frame should be an even patch of tonality. Set the focus of the lens to infinity to blur the texture of the graycard and to alleviate vignetting and loss of exposure from close focus.
Before exposing any film make sure to check that your lighting across the graycard is even! I recommend doing this with a spot meter since that ensures the tonality of your graycard is tied to middle gray.
Begin by exposing a few frames with the lens cap on so that there are some frames with no exposure. This is important for establishing your Standard Printing Time in the next step.
Next, expose the graycard properly at your metered exposure. Now, begin to underexpose in 1/2 or 1/3 stop increments until you have reached six stops underexposed. You should do this primarily through shutter speed. Use the aperture only for 1/2 or 1/3 stop changes in exposure. For example, let’s say that my graycard meters at 1/30th of a second at f/2.8. Then I would underexpose by the following:
-1/3 stop is 1/30th at f/2.8 1/3
-2/3 stop is 1/30th at f/2.8 2/3
-1 stop is 1/60th at f/2.8
In this way the aperture stays within the same one stop range. Also, it prevents the depth of field from becoming so great as to bring the graycard into focus. Also, make sure to avoid using ND filters since these may not be precise enough.
Having completed exposing the roll of film you can then develop it at the recommended developing time.
2.3 EFS Test Example
Here is a photograph of my negatives from an EFS test with Agfapan APX 400 in Pyro PMK developer. Since I had only 12 frames with the roll of 120 film I chose to change the exposure in 1/2 stop increments. Also, I had gleaned from someone else’s experience that the film would lose about 1 stop in speed in PMK. I shot this roll with my light meter set to 200 EI figuring I would be closer to the appropriate EFS. Unfortunately, I cannot remember which resource provided the 16 minute developing time.

Image 2.1 - Many apologies for just a cellphone photo, but you can still understand the example well enough! The graycards photographed on this roll started at two stops underexposed down and proceeded to four stops underexposed in half-stop increments. Notice my deliberate exposure with a lens cap on and this frame noted on the sleeve. The yellow stain of PMK Pyro developer is very apparent.
The notations on the negative sleeve may seem mysterious but I will explain my logic in subsequent steps.
3.0 The Standard Printing Time (SPT)
The printing time of our negatives must be established for the rest of the test. Since we are establishing a system of tonal control any variation in printing time would be catastrophic.
3.1 Establishing the SPT
Begin by setting the enlarger head at a height you will make all the test prints at. Image 5.2 shows that I set the enlarger so that the frame of my scene fit within an 8x10 sheet of paper. You are welcome to select any height that best fits how you want to work. However, write down this height and make sure the head is securely locked off. Get your chemicals mixed and ready in their respective trays.
Load the unexposed frame from your EFS test into the enlarger or lay it on the paper if you are contact printing. Make sure to set your enlarging lens to your standard f/stop for printing. (I used f/11.) Set the enlarger’s timer control to 30 seconds and get a black piece of cardstock ready to use as a dodging tool.
With the lights off in the darkroom load a sheet of paper or a strip of paper into the easel. Cover the paper with the black cardstock so that only one inch is exposed. Now, switch on the timer and move the cardstock about one inch every three seconds until all 30 seconds have elapsed.
Develop your exposed paper at the recommended developing time. Make sure to wash the print and let it dry before making any assessment.
3.2 Interpreting the SPT Test
Once the paper strip is dry take it into a situation with strong, but not direct illumination. Some photographers have an area of wall in their darkroom lit like a gallery in order to judge their prints. I’ve made many judgements standing outdoors in the shade of a porch. Do not make judgments holding the print in direct sunlight, or under lights that are too dim.
The SPT test strip will likely be mostly black before emerging into steps of dark tones, and finally steps of gray tones. The SPT is where the exposure time produces the first true black for the paper. Knowing that the lightest tone on the paper is a 3 second exposure time just count down until you reach the exposure time that produces a black indistinguishable from the rest.
3.3 SPT Example
In my tests of APX 400 to Oriental Seagull GFII paper in Ansco 130 developer I found an SPT of 18 seconds.
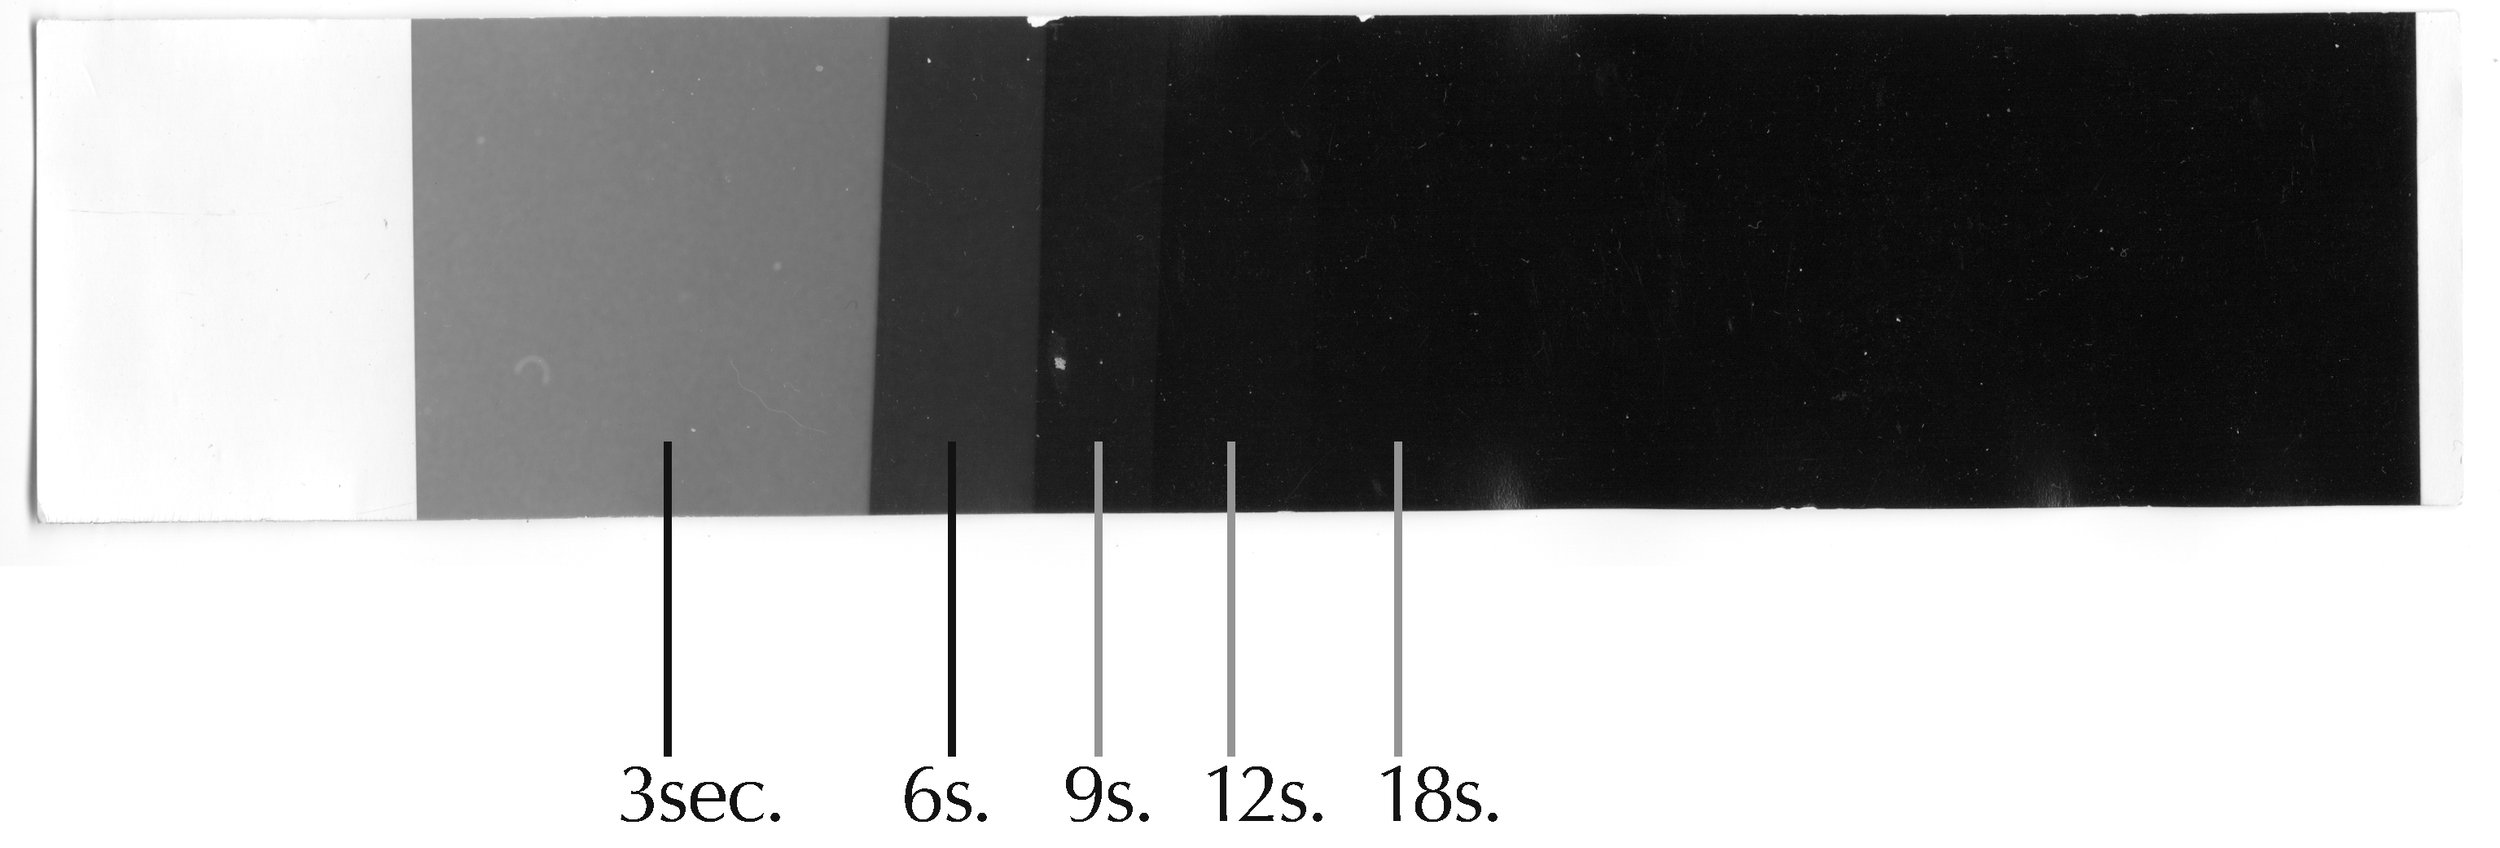
Image 3.1 - A scan of the SPT test strip is a pale imitation of the real thing. I hope on your monitor that you can see the slight difference between 12 and 18 seconds. I could not distinguish changes in tonality from 18 seconds onward. This strip established my Standard Printing Time as 18 seconds for APX 400 printed to Oriental Seagull GFII in Ansco 130 developer.
3.4 Technical Rationale for Establishing the SPT
Developed film is not perfectly transparent. The plastic base supporting the emulsion has a slight density and this density is different for roll films, such as 35mm, than for sheet films such as 4x5. Also, the chemical activity from development creates a slight ‘fog’ to the unexposed film. The photographer desires that this Base+Fog is exposed to the paper to produce a deep black.
Be aware that different film and film developer combinations, as well as different speeds of film have different Base+Fog levels. Therefore, you need to find the SPT for each film and developer! For example, my SPT times for APX 100 is 12 seconds compared to the 18 seconds for APX 400 in the same developer. This is due to the fact that slower speed films have less Base+Fog.
4.0 Printing and Interpreting the EFS Test
With a Standard Printing Time established one can now print the grayscale patches from the EFS test negative.
4.1 Printing the EFS Negative
With the enlarger still in the same settings, and fresh chemicals in the trays (if necessary) - frame of the EFS negative at your SPT. Make sure to keep track of the negative numbers or the underexposure values for each print. I write the data on the back of the photo paper with a soft leaded pencil. Develop each in your chosen materials for this calibration procedure.
There are two good tips to follow during this procedure. First, you can trim down your paper to a smaller size in order to save some money. I cut out pieces about 2x4 inches when I performed this method. Second, you can load the negative in the tray so that two graycards are visible at once. This has the advantage of saving on time and money, but also giving you a black unexposed strip between the two graycards which helps make judgments of tonality.
4.2 EFS Interpretation Example
What we are looking to ascertain is the level of underexposure that provides a just noticeable tonal difference from black. Ideally, this difference should be at the point where the film is four stops underexposed. Remember, four stops underexposed from Zone V (Middle Gray) is Zone I, which by definition is where tonality emerges from black but where there is still no texture.
For my tests I started with the graycards exposed two stops under. Here are the EFS prints:

Image 4.1 - I printed across two frames because it is a more efficient use of materials, and provides a black reference in the unexposed section between. The underexposed graycards in the print on the left light enough to be considered Zone II. However, the print on the right shows underexposed graycards just above black, on Zone 0.
The graycards on the left are so light as to be in Zone II. However, the graycards on the right are just barely perceptible in comparison to the unexposed region between the two frames. These look my preferred Zone I areas but we should look at the next two prints to make sure.

Image 4.2 - The underexposed graycards is these prints are indistinguishable from black.
The graycards from four stops under and below are indistinguishable from black. So I need to look back at the print with the -3 and -3 1/2 graycards in order to determine my film speed.
Remember that I exposed this film at an EI of 200. If 200 EI was the appropriate speed to place a graycard in Zone I that would mean I would be able to see a slight tonal difference on the print exposed to the -4 graycard. However, it’s not visible so my EFS (or EI) is not 200. Since the exposures above -3 did print with a tonal difference we can reason that my film is slower than 200.
To make these judgments easier I wrote the EI corresponding to each exposed graycard if it printed with tonality. You can see these written in red sharpie on my negative sleeve in Image 3.1. Here is a table:
-2 stops = 50 EI
-2 1/2 stops = 75 EI
-3 stops = 100 EI
-3 1/2 stops = 150 EI
-4 Stops = 200 EI
-4 1/2 stops = 300 EI, etc.
I felt the optimal Zone I was between -3 and -3 1/2 stops underexposed so I chose the EFS of 125 for APX 400. So development in PMK lost 1 2/3 stops of speed!
4.3 Technical Rationale of Establishing the EFS
The famous Zone System adage is “expose for shadows and develop for highlights.” Establishing the Effective Film Speed for your film/developer combination you are “exposing for shadows.” You are determining the EFS so that the shadow detail of a scene is not lost in the Base+Fog, but emerges just slightly lighter than black.
I cannot stress enough the importance of these first steps in calibrating. Just making sure that your subject luminance range is all contained within the straight line portion of the film curve provides one with a negative capable of successful printing.
5.0 Establishing Development Time
Armed with the Effective Film Speed and Standard Printing Time we can now determine the optimal Development Time. I recommend doing this on a new day in order to start with a fresh mind.
You will need to set up your ‘Scene’ as discussed in part 1.3, as well as make sure your darkroom is in the same set-up as when you performed the SPT and EFS procedures.
5.1 Getting the ‘Scene’ and Darkroom Ready
Place your objects and light them carefully. Remember that any standardized chart in frame, such as a graycard or ColorChecker, needs even lighting. Use your spotmeter to also take notes of the different luminance levels of the objects. You need to ensure that your final print renders Zones as close to optimal as possible. These are the important tonal regions I consider:
Zone V - Middle Gray - A perfectly exposed and developed negative should make the graycard in your print the same exact tone as the graycard in the scene.
Zone II - This Zone is the first emergence of detail in the shadows. Make sure to locate an object that meters three stops under your graycard. Select an object with texture!
Zone VIII - This Zone contains highlights with details before drifting off to white. Make sure to find an object that meters three stops above your graycard and contains texture.
With your scene established and lit now go set up the darkroom. Check that the enlarger is still at the same height above the easel. Make sure to do this on a day without interruptions since you will need to jump back and forth between the scene and darkroom.
5.2 Exposing the First Roll of Film
Expose a roll of film to the scene at the EFS you determined from the previous steps. I also chose to over and underexpose it in 1/2 stop increments, but this proved to be unnecessary. You can see in the negatives below I also exposed a graycard at Zone I (4 stops underexposed), Zone V (proper exposure), and in whole stop increments above Zone V.
Next, develop the film at the same developing time used for the EFS test. In my case this meant I exposed APX 400 at 125 EI and developed it in PMK for 16 minutes.

Image 5.1 - The reason for over and underexposing the scene in half stop increments was to ensure a printable negative if for some reason my EFS was off. This way I could select a different exposure level to print and recalibrate my EFS. I printed the overexposed graycards in a manner similar to the EFS test. However, this time I wanted to see if Zone IX was a slightly lower tone than the white of the paper.
From this point onward it’s a little easier to explain the procedure through the lens of my own experience.
Once the negatives were dry I mixed my paper development chemicals. Taking the normally exposed negative I printed it to Oriental Seagull GFII at the SPT of 18 seconds. I developed this in Ansco 130 with my usual development time and agitation.

Image 5.2 - The first print of my ‘scene’ at EI 125 and a Development Time of 16 minutes. Notice that I scanned this print with a graycard covering the top. I think this helps the reader make their own judgment with a reference in the same screen.
Once the print dried I compared the tonality in the print to the canonical Zones. The black square (bottom right) is visibly separated from its surrounding black border so I know my shadow detail is coming up in about the right place. However, comparing the print to a real graycard I found my printed graycard too bright. To help in this comparison I scanned my print with a graycard as a reference. Also, the crinkled aluminum foil metered in zones ranging from 2 to 3 stops above Middle Gray, but in the print is very bright and lacks highlight detail.
This developing time of 16 minutes produced a print with too much contrast. In order to compensate I need to develop for less time. However, if your first roll produces a print with lower contrast than you need to increase your developing time.
I made the decision to reduce the developing time by 10% and rounded the value to 14:30 minutes. Now I returned to my scene to expose and develop another roll of film.
5.3 Second Roll of Film at a New Developing Time
After setting my camera back onto its tripod I checked my lighting and exposure. I exposed a second roll of film at 125 EI. Taking this to the darkroom I developed it for a time of 14:30 minutes and struck a new print.

Image 5.3 - The scene from my second roll of film developed at 14:30 minutes. Notice the slightly lower contrast and the retention of highlight details in the aluminum foil.
This development time still maintained shadow detail, but now my graycard in the scene appeared even closer to the physical graycard. Looking at the aluminum foil you can see how delicate highlight detail is now maintained.
Even though this felt like the proper time I decided to reduce my development time by another 10% just to double check. I don’t recall my logic at this point but I selected a development time of 12:45 minutes.
5.4 Third Roll of Film at a New Developing Time
Repeating the same procedure as before I exposed another roll at 125 EI, developed it at the new time, and struck a third print.

Image 5.4 - The third roll of film developed for 12:45 minutes. Judging from the actual scene I felt this to be the best representation of tonality.
I thought this new print would overshoot, but instead the graycard was now nearly an identical match. I also noticed that the further reduction in contrast helped open up dark detail (look in the black lacquer tray) and retain nuanced highlights in the aluminum foil.

Image 5.5 - Here is a line-up of the critical area of the scene at the three development times.
Beyond just the tonality notice how bringing the exposure and development time into alignment also makes the image appear more dimensional!
5.6 Technical Rationale of Establishing Development Time
Establishing the proper EFS or EI fulfilled the first half of the zone system adage. Now, by adjusting the development time we change the contrast of the image to place our highlights so that their detail is appropriately rendered. This completes the second half of the sensitometric truth to “expose for shadows and develop for highlights.”
6.0 Finishing Up
While this procedure will take many hours over one or two days the effort is invaluable. I recall that even just knowing the properly calibrated EI and Development Time meant more of my images were properly exposed and therefore easier to print.
The calibration procedure is not over because the next step involves exposing film in the world and confirming that the test scenario works in reality. I recall that my chosen values produced immediately satisfying results. Nonetheless, I’ve spoken to others who ended up nudging the EI by 1/3 of a stop, or changing the development time by a minute. This is acceptable in order to align your vision with the tonal rendering in the print.
On a final note I should point out that this calibration procedure establishes ‘normal’ development for a ‘normal’ subject luminance range of around 7 stops. If your scene is greater or smaller than this range you would need to adjust your development time and EI accordingly. These situations call for the technique of Push or Pull development. Calibrating a film/developer combination for changes in development time is more involved and I’ve already written a long enough post.
Nonetheless, my hope is that giving preliminary instructions and an example of Zone System Calibration inspires others to at least try. The process may well be tedious, time consuming, and perhaps frustrating. Yet, it will improve your eye, metering and exposure, and darkroom technique. Most importantly, Zone System Calibration provides an intimate understanding of your materials and the image-making process.