Exposure Concepts for Cinematography
(Each semester I give incoming students to the Science of Cinematography course a series of questions involving exposure concepts ranging from easy to difficult. I ironically call it Cinematographical Calisthenics and it not only provides insight into how well-versed the student is with their medium, but also provides an opportunity for students to practice the mental manipulation of all the technical aspects that realize a properly exposed negative. What follows is a guide I wrote in order to refresh their memory on these concepts and I have decided to post it publicly to receive any feedback. If you would like to try and complete the assignment you can also e-mail me for a copy.)
1.0 Introduction
Both Camera I & II introduce and explain the concepts covered in this supplement. Nonetheless, there is inestimable value in revisiting past lessons to reinforce what you know, and clarify terms and concepts that may be muddled. Even if you feel confident in your knowledge please take the time to read this since I use different terms than what you may have encountered in previous courses.
2.0 The Appearance of Brightness
The appearance of brightness is determined by a complex chain beginning with incoming photons absorbed by the photoreceptors in the retina. This photochemical reaction is then passed through a web of neural circuits and finally to the visual cortex. Since our visual system responds in a nearly logarithmic manner to changes in light we perceive slight changes of brightness in low light far more easily than under bright circumstances.

A simple log curve. Consider the x-axis as quantity of light (footcandles, for instance) and the y-axis as the response by the human visual system. You can see how in low light situations there is a dramatic response to light, but as the light intensity increases our system clamps down on the signal so as not to be overwhelmed by information.
If you are looking for visual confirmation of this fact look at a log recorded image such as Arri’s LogC or Sony’s S-Log. The reason for the image appearing so low contrast is the compounded effects of the logarithmic display in brightness and the logarithmic sensitivity of our vision.
Due to the particular sensitivity of our vision to brightness and color the visual arts rely on exponential changes in the materials. For instance, a step chart (such as a Kodak Q-14 or an XRite Colorchecker) appears to have a linear change in brightness from black to white, but the quantity of pigment is increasing at an exponential rate as the steps get darker. This is also the case for photography where each “stop” is either double or half the intensity, sensitivity, or length of time depending on the scale being used. This is a fundamental fact to understand about the relationship of our vision to the visual arts; the combination of our vision’s logarithmic sensitivity with materials displaying exponential changes appears as linear, or equal steps of change in brightness.

In order to achieve proper exposure the photographer learns to manipulate a wide range of factors that must all follow exponential scales in order to appear correct to us. By exponential I mean that each change involves a factor of two - doubling or halving quantities.
3.0 Exposure
Exposure is the relationship between the sensitivity of the sensor (whether film or silicon) the intensity of light that is incident upon it, and the length of time the sensor is exposed to light. In this document I have separated the different components of exposure into three major categories. First, we will consider light in nature as it falls onto a scene or is reflected by objects. Next, we will look at the factors surrounding the camera that alter the intensity of the light such as the f/stop of the lens, the sensitivity of the film, and filters. Finally, we will consider the length of time of the exposure. The basic mathematical relationship in a simplified form is expressed as:
Exposure = Intensity / Time
While the above formula is not useful in calculating exposure in a practical situation it demonstrates an important relationship in reciprocity. Basically, the exposure is the same so long as the intensity of light incident upon a sensor and the time of exposure are changed in reciprocal to each other. For instance, if you lose one stop of light from your unit you can double the length of the exposure time so that the same exposure is achieved. This flexible relationship of give and take between lens aperture, exposure time and ISO allows the photographer to deal with a wide range of situations as well as create a specific aesthetic.
3.1 Exposure Scales
Photographic scales are divided into stops. “Stop” is a term used fluidly in photographic technology but which can refer simply to a point of reference, i.e. “set the lens at this stop” as in setting the aperture to a particular f/stop, or in terms of a difference in quantity by a factor of two, i.e. one stop more light is twice as bright, or one stop less is half as bright. The origin of the word in its use in photography is obscure, but one can think of it much how stations along a route serve as important geographic markers.
Stops mark out points on an exponential scale where each step is either double the previous or half the following quantity. The reason stops are useful is to help simplify quantities into equal steps rather exponential numbers. For instance, if you have a light outputting 400 footcandles it is easier to say we need to lower the output of the unit by six stops instead of “decrease the output by a factor of 64 times!”
A change in stop from a single reference point:
1 stop 2 stops 3 stops 4 stops 5 stops 6 stops
Increasing: 2x 4x 8x 16x 32x 64x
Decreasing: ½ ¼ 1/8 1/16 1/32 1/64
Changes in stops can also be expressed as a percentage:
1 stop 2 stops 3 stops 4 stops 5 stops 6 stops
Increasing: 200% 400% 800% 1600% 3200% 6400%
Decreasing: 50% 25% 12% 6% 3% 1.5%
While all the photographic exposure scales are readily known in whole stop increments they can also be broken down into ½ or even 1/3 stop divisions for greater accuracy. Where possible I have included these finer markings. While light meters read with an accuracy of 1/10th of a stop and scientific measures of photographic materials are even more accurate I’ve found 1/3 stop accuracy to be a practically achievable tolerance.
4.0 Light in Nature
The first consideration for the photographer involves the amount of light from nature or their lighting units. Within a large range of the visual arts there is only consideration of how a painting or graphic appears and therefore the amount of light reflected, or transmitted, to the observer. However, the cinematographer must not only contend with light reflected from objects within their scene, but also control aspects of lighting or the light incident upon the scene. This difference between incident and reflective is usually addressed in regards to light metering but is crucial to working effectively with control of lighting, exposure and tonal reproduction.
4.1 Quantifying Incident Light - Footcandles
Incident light is categorized as a photometric quantity of Illuminance – the amount of light falling onto a surface. When using an incident meter you are measuring the quantity of light falling onto the white dome of the meter. The quantity is given in footcandles, which for simplicity sake one can imagine as the amount of light from one candle falling onto a surface one foot away from the flame. (The real definition is much more complex, but this image is helpful as a starting point.) The higher the number of footcandles the greater the intensity of light is falling onto your subject or meter. In fact, your light meter probably reads footcandles but you rarely use this feature since it is simpler to input the the ISO and frame rate of your camera in order to get a reading of the correct f/stop.
The quantity of footcandles (abbreviated fc) must be increased, or decreased, in an exponential fashion to appear as a linear change in brightness and each double or half of a quantity is a stop. For example, if you have a light reading 100 fc and you want to lower it by one stop you put a double scrim in front of the lens and the source now ideally reads 50 fc with your meter. Conversely, increasing your exposure by two stops requires a unit with four times the output. So if 100 fc is not enough you need a unit that outputs 400 fc. Be aware that you can also have fractions of a footcandle in low light situations. A light that outputs ½ fc is twice as bright as a light outputting ¼ fc. This may seem unusual but keep in mind that we could view this situation from as fine-grained a perspective as counting photons where eight photons is one stop brighter than four photons.
The practical importance of understanding footcandles is that lighting manufacturers give information about their light units in footcandles or the SI equivalent Luxbecause these are pure quantities of intensity independent of sensor sensitivity, exposure time and aperture.
4.2 100:100:2.8 Rule
A useful “rule” to remember is the 100:100:2.8 rule. Honestly, it’s not a rule but just a mnemonic that states the correspondence between three quantities - that 100 footcandles with 100 ISO film is correctly exposed with the lens at f/2.8. (This “rule” assumes that you are shooting 24fps at a 180 degree shutter.) Even though the photographic press writes the rule with ratio signs this rule is not a ratio - that decreasing one quantity does not entail that another quantity increases. Rather, that as one factor of this correspondence is changed, one must alter the others in a manner which keeps the exposure the same.
For example, a common mistake students make is to simply lower a number in one category if another one is raised. If you change your ISO from 100 to 200 and you need to change your f/stop to compensate for the one stop increase in sensitivity you need to set your lens at f/4. I commonly get the answer as f/2 because the student is not thinking about the exposure, but simply looking at the numbers.
4.3 Quantifying Reflected Light - Percentage
The amount of light reflected from objects is dependent on that particular object’s response to the energy of light striking it. This is a very complex topic when considering the color of light and the color of the object, but for the time being we will treat this subject only with neutral tones, which reflect the visual spectrum equally. White and very light objects reflect most of the light that is incident on the surface and would therefore have a reflective percentage of 90%. You may notice when you go buy copying paper they print this on the package. An object that is very dark absorbs most of the light so something like black velvet may reflect only a small percentage.
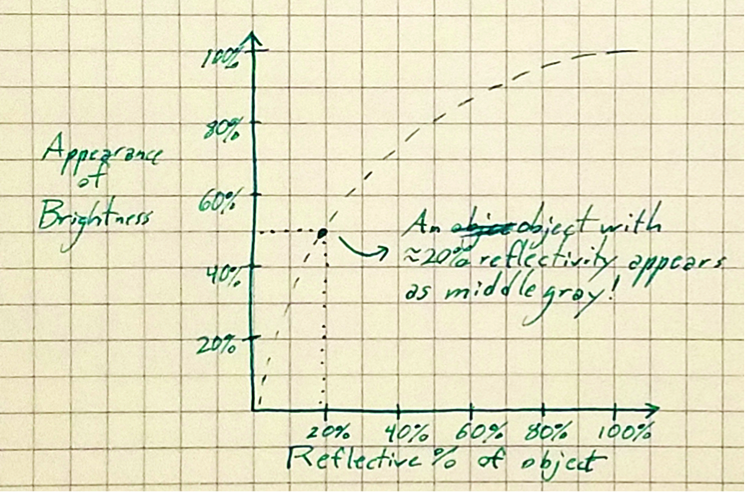
You may remember that a graycard reflects 18% of the light incident upon it and this tone is “middle gray” or “Zone V.” Many people wonder why the graycard is not 50% if it is middle gray. That’s because our sensitivity to light is logarithmic so objects reflecting 18% appear in brightness as middle gray. (The actual midpoint is 19.9% reflected light, but that’s another discussion.)
Every double or half of the percentage of reflection is a full stop. So if you are lighting an object that has 50% reflectivity, and then you swap it for an object with 25% reflectivity then this new object is a stop darker. Similarly, if you swap someone’s dark jacket with 6% reflectivity with a new coat that has a reflection of 24% then it would appear two stops brighter.
4.4 Inverse Square Law
The intensity of a light source is going to change depending on the distance to the subject - obviously the farther a light source is from your subject the less light falls onto your subject. Lighting manufacturers publish photometric tables that correlate a given footcandle output with a specific distance. Or, they may have a useful calculator like Arri’s Photometric Calculator. However, if you have only one known distance and intensity you may need to calculate the footcandles for the distance you know the light will need to be positioned at.
Light intensity decreases at a rate of the distance squared. The simplified formula is as follows where Iv is the initial intensity and Ev is the final intensity. The units for distance are arbitrary but here in the US you will find the distance is almost always in feet.
Ev = (Iv / distance)^2

This diagram illustrates how the formula works for a light source that has an initial value of 200 fc at 1 foot. Notice that at each foot it falls to a fraction of its initial intensity by the distance squared. So at four feet the light falls to 1/16th of its initial value and would read 12.5 fc on our incident meter.
Since it is highly unlikely you will work with any lighting unit at a distance of 1 or 2 feet here is a formula that takes into account larger distances:
Ev = Iv / (Current distance from source to subject/Initial distance)^2
This version of the formula is better because if you are given an initial light intensity at a distance of 100 feet, you would need to work in 100 foot increments. Obviously, if the light is moved to 101 feet it would not fall by two stops and it would be a mistake to divide the footcandles of the unit by 1012. Moving the light 200 feet away from your subject it would result in a two stop loss of light. So for the correct distance it’s best to divide the current distance from light source to subject by the initial distance reported by a manufacturer.
5.0 Camera Controls for Intensity of Light
The intensity of light from your scene is next altered by the technology of the lens and camera.
5.1 F/Numbers
F/Numbers, f/stops, or Focal Stops, are the ratio between the focal length of a lens and the diameter of the aperture. For example, a 50mm lens with an aperture diameter of 25mm has an f/stop of f/2.
Focal Length/Diameter of aperture = f/stop
50mm/25mm = f/2
The beauty of this system is that it allows lenses of different focal lengths to pass the same amount of light to pass regardless of the focal length. For instance, a 25mm, 50mm, and 100mm all allow the same amount of light to pass through when set at an f/2. In order for this to occur the aperture must be set to a different diameter for each lens: at 12.5mm for a 25mm lens, at 25mm for a 50mm, and at 50mm for a 100mm lens. The only confusing aspect of the f/number scale is that initially students find it counterintuitive that lower f/numbers allow more light through than the higher f/numbers. This is a common mistake in answers that will go away with practice.
F/numbers are a mathematical construction and do not take into account different lenses of radically different designs using as few as six elements or glass to as many as sixteen. The more elements of glass the more light is lost due to reflections at each air-to-glass surface. Also, light is lost within the mechanics of the lens. T-stops, or Transmission stops, account for the difference by measuring the percentage of light lost and compensating with a slightly different sized aperture. For instance, to make a more complex lens design like a 25mm Distagon achieve a true f/2 the aperture may need to be set to 13mm or 14mm in diameter rather than the calculated 12.5mm. Once this transmission accurate diameter is found the ring is marked T2 in order to distinguish it from f/stops. All motion picture lenses, except some older makes, are marked in T stops so that entire lens sets within a manufacturer and even between manufacturers match very closely.
Should I be saying f/stops or T-stops? In cinematography people use both terms flexibly and without any loss of understanding but there is a distinction in the fact that T-stops only refer to markings on a lens. Your light meter will read in f/stops and when discussing the general concept of exposure one should also speak in f/stops. When discussing the stop for a lens one should speak in reference to T-stops. The distinction is academic and not necessary to follow in practice, but is preserved in these exercises for clarity.
Should I be saying “f/2.8 and a half, 2.8-4 split, or f/3.5 on set? There is no incorrect method of expressing an f/stop as long as it is clear. I personally like using fractions since memorizing the ½ and 1/3 stop fractions is impractical and most crew don’t know them. On the other hand, I have been on sets where these numbers where used and one was expected to know them. Pick a method and be flexible, but don’t give people a hard time if they don’t communicate the same way as you do.
“Shooting Stop” – A shooting stop is the chosen f/stop for which to photograph a scene. In older Zone System parlance this was referred to as the Key Stop. The selection of a shooting stop helps the cinematographer and gaffer set all lights for a given range of exposure around the shooting stop. You will also encounter that cinematographers typically pick a single f/stop to shoot a scene or even an entire movie because this means the characteristic contrast and resolution of the lenses remains the same throughout.

Numbers at top are whole stops, middle numbers in blue ink are half stops, and lower numbers in green are one-third stops
5.2 ISO & EI
The sensitivity of a sensor to light is given as a “rating” where the higher the number the more sensitive to light the sensor is and vice versa. The ISO of a sensor is determined by a specific scientific test determined by the ISO organization. These numbers provide a useful means to identify whether a sensor is very sensitive to light (fast) or not very sensitive to light (slow) and to relate these quantities to each other.
EI, or Exposure Index, uses the same numbers as the ISO scale but the key difference is that EI is not determined by authorized test procedures. EI is chosen by a manufacturer as a “best practice” rating of the sensor, or by a cinematographer changing the rating of a sensor for a particular aesthetic result. For example, the manufacturer may test a film and identify its speed as 400 ISO but if I like the look of the film rate at 200 and pulled 1 stop in development I should appropriately say that I am using the film at an EI of 200.

Numbers at top are whole stops and lower numbers in green ink are one-third stops
5.3 ND Filters
Another important means of controlling the intensity of light is through Neutral Density filters in front of or behind the camera lens. This is a a filter containing an achromatic pigment that cuts the intensity of light depending on the density of the pigment. These are commonly provided in whole stop increments, although ½ and 1/3 stops NDs can be made and do exist for scientific purposes.
ND filters are labelled with an unusual scale of numbers which are the logarithm of the amount of light lost by the filter. (Check out the logarithmic curve I plotted near the beginning of this article.)
If an ND cuts the light by a factor of 2, then log(2) = .3. As you may remember an ND.3 loses 1 stop of light or cuts light by a factor of 2.
If an ND cuts light by a factor of 4 then log(4) = .6.
The logarithmic scale provides simpler numbers since each .3 step is a 1 stop change in the intensity of light. For instance, it’s much easier to refer to a filer that cuts light by a factor of 128x by its logarithmic number 2.1.
6.0 Exposure Time
Exposure time is the length of time in seconds that a sensor is exposed to light. In analog cameras this is the length of time the shutter is open allowing light from the lens to strike the film. For digital cameras, which don’t always have a mechanical shutter blocking light, this is the length of time the light sensitive photosite is allowed to gather photons before being reset for the next exposure. In the motion picture industry the exposure time is governed by the frame rate – 24 frames per second in the U.S. This does not mean that each frame is exposed for 1/24th of a second because some time needs to be allocated toward moving an unexposed frame of film into the path of the lens. Cameras adopted a semicircular or “half-moon” rotating shutter that covers the film half the time allowing the next frame to be transported into place behind the lens, and open the other half for exposure. The shutter opening is expressed in degrees of on angle and the standard 180 degree angle cuts the exposure time in half.
180/360 = 1/2 ½ x 1/24 = 1/48th of a second
Due to the engineering of film cameras this why 1/48th of a second is the adopted standard for all of the motion picture industry.
6.1 Frame Rate - Changing Shutter Speed
Running the camera at a different frame rate for fast or slow speed motion changes the exposure time. Each whole stop change in exposure is either double or half the given frame rate.
3fps 6fps 12fps 24fps 48fps 96fps 192fps
With a 180 degree shutter the corresponding exposure times are:
1/6 1/12 1/24 1/48 1/96 1/192 1/384
6.2 Shutter Angle
Many film cameras allow adjustment to the opening in the shutter in order to change the exposure time without altering the frame rate. A shorter exposure time reduces motion blur in a moving subject and vice versa. Once again, each double or half of the angle is a one stop change in exposure.

Each of these shutter angles cuts exposure down by a factor of:
180/360 = ½ 90/360 = 1/4 45/360 = 1/8 22.5/360 = 1/16 11.25/360 = 1/32
The corresponding exposure times at 24fps are
1/48 1/96 1/192 1/384 1/768
Understanding the relationship between exposure time and shutter angle helps one calculate shutter angles for special situations such as the following:
Filming at 24fps in Europe where the current is 50Hz requires an exposure time of 1/50 of a second to avoid lights flickering. The camera can remain at 24fps if a proper shutter angle is found that gives 1/50 of a second.
x/360 x 1/24 = 1/50
Solving for x gives you 172.8
Another common scenario is filming with computer monitors which flicker at 60Hz. This requires a shutter angle that gives an exposure time of 1/60.
x/360 x 1/24 = 1/60
Solving for x gives you a shutter angle of 144 degrees.
While digital cinema cameras often give a shutter angle adjustment in the menu this is just a legacy feature that actually changes exposure time. In actuality the camera collects and resets each photosite for a specific time. All the math is the same except that digital cameras can allow for “shutter angles” greater than 180.
7.0 Discussing Exposure within a Scene
Once a student is accustomed to metering and setting exposure on the camera the next task to connect these concepts to lighting within a scene and to match these to the limits of one’s medium. The first useful concept is setting lights is contrast ratios, especially since it is rare that all the lights on set will be at the shooting stop.
7.1 Contrast Ratio
Contrast Ratio is the difference in intensity between two lights, or two metered areas in a scene. This is never given in logarithmic numbers but expressed as a ratio.
Ex. If one light outputs 100fc and a second is 200fc this is a ratio of 1:2
Ex. If one light outputs 5fc and another 20fc this is a difference 4 times so this is a ratio of 1:4
Here is a chart to compare the contrast ratio to the number of stops difference:
1:2 – 1 stop
1:4 – 2 stops
1:8 – 3 stops
1:16 – 4 stops, etc.
7.2 Subject Brightness Range or SBR (Sometimes called Subject Luminance Range)
Another major concern of a cinematographer is whether the range of light in a scene is able to be successfully recorded by a medium, or, in other words, the lowest desired shadow detail is not lost in the noise floor nor are highlights “blown out.” Many refer to the range of exposure a medium can successfully reproduce as latitude, but this is incorrect and that term is used very differently in sensitometry. The correct term is SBR or subject brightness range – the range, usually given in stops, of light intensity from a scene the medium can successfully record and reproduce without extensive post-production processes.
For example – if a film stock has 7 stops of SBR this means it can successfully record and reproduce exposures up to 3 ½ stops under neutral gray and up to 3 ½ stops over. So long as the brightest and darkest objects you wish to recorded by the sensor with detail are within that range then your post correction will be much more easy.
8.0 Tying it All Together
While this post may be a slow journey through a thicket of technical topics my intention is to display how these concepts unite into the successful realization of an image. Moreover, I hope they can more clearly shed light on the interrelation between all the technical controls the cinematographer has for exposure. Back in the analog era we were required to be extremely conversant with these concepts and be able to juggle them all in our heads (or for me, count them on my fingers) to ensure we achieved the correct exposure. Too often I hear an argument that today we can look at a monitor and no longer need to be tied to these technical scales. That may be somewhat true, but I don’t have an Arri Alexa and a calibrated monitor on scouts, nor does my pre-rig team working at the next location on a job. At the end of the day we must be so conversant with the technical aspects of our work that our mind is free to use our technical control for artistic ends. So - it sucks to learn it - but get used to it now.
8.1 Where Does it Go From Here
The successful recording of an image is not the end of the photographic process, but the beginning of a journey toward proper realization. To paraphrase Ansel Adams - if the negative is the score, the print is the performance. The further steps of process the film or digital image and realizing it in print or projection is the process of tonal control which is covered by the science of sensitometry. This is too great a topic to cover here, but one should be aware that what I have written here is just a small part of the photographic journey from subject to image.